I've forgotten what we called this on the old site. It's intended for requests for comments on editing results - 'before and after', etc.
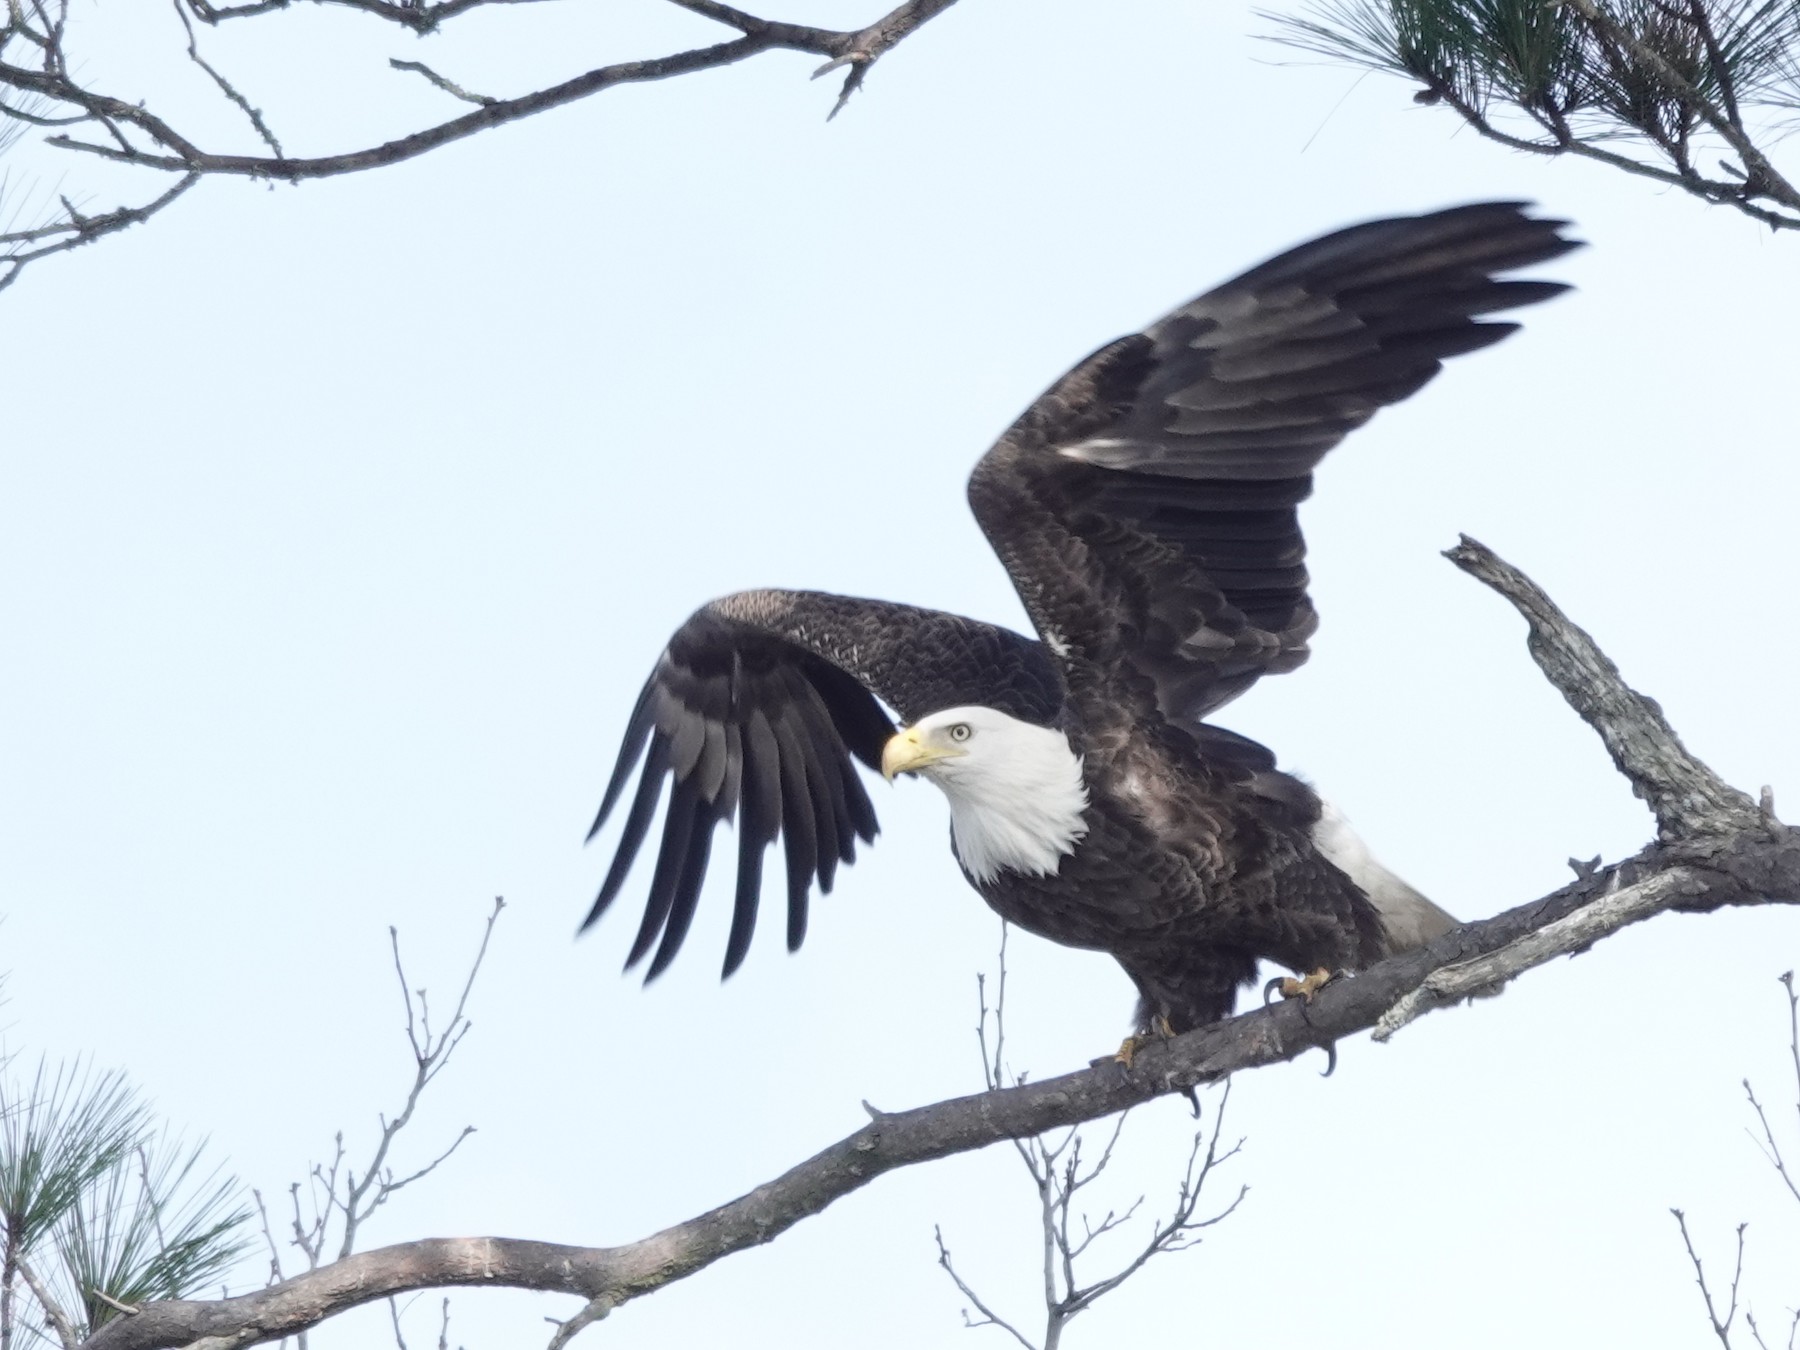
How would you crop this? I can forward the .JPG if requested Thanks!
Photo Editing Criticism and Feedback
-
Charlie Spencer

- Posts: 279
- Joined: Wed Jan 07, 2026 8:08 pm
- Location: Sunset Harbor, North Carolina
- Has thanked: 565 times
- Been thanked: 354 times
- Contact:
Photo Editing Criticism and Feedback
You do not have the required permissions to view the files attached to this post.
Sunset Harbor NC USA

-
Lonestranger

- Posts: 494
- Joined: Wed Jan 07, 2026 9:48 am
- Location: Waterloo region, Ontario, Canada
- Has thanked: 243 times
- Been thanked: 205 times
- Contact:
Re: Photo Editing Criticism and Feedback
Charlie Spencer wrote: Fri Jan 09, 2026 2:15 pm I've forgotten what we called this on the old site. It's intended for requests for comments on editing results - 'before and after', etc.
How would you crop this? I can forward the .JPG if requested Thanks!
Unlike Kevin, I would crop the image so the eagle is more to the right, unsure if I'd go upper right or lower right though. Send me the original sized photo and I'll share my crop ideas, once I figure out what they are.

-
Michael Long

- Posts: 5
- Joined: Thu Jan 08, 2026 6:14 am
- Location: San Mateo County, California
- Has thanked: 9 times
- Been thanked: 26 times
Re: Photo Editing Criticism and Feedback
I’d crop it so that the eagle is on the right side of the photo, and the leaves are acting as a frame on the top.
Young birder from San Mateo County, California.
-
Lonestranger
- Posts: 494
- Joined: Wed Jan 07, 2026 9:48 am
- Location: Waterloo region, Ontario, Canada
- Has thanked: 243 times
- Been thanked: 205 times
- Contact:
Re: Photo Editing Criticism and Feedback
I played around with tighter/looser crops, but I think this is the crop I would go with. I also ran Auto Tone in my photo editor(Lightroom) and then slid the Contrast slider from -25 to +10 while leaving the Highlights, Shadows, Whites, and Blacks at the Auto Tone levels, I then added +10 Sharpness. This was cropped from 5472x3648 to 2391x1594 pixels and then resized to 1200x800 before uploading.
This looser crop was a real close second, but didn't get the same Auto Tone adjustments or Sharpening the tight crop did. Cropped from 5472x3648 to 3232x2155 pixels and then resized to 1200x800 before uploading.
This looser crop was a real close second, but didn't get the same Auto Tone adjustments or Sharpening the tight crop did. Cropped from 5472x3648 to 3232x2155 pixels and then resized to 1200x800 before uploading.
You do not have the required permissions to view the files attached to this post.
-
Lonestranger
- Posts: 494
- Joined: Wed Jan 07, 2026 9:48 am
- Location: Waterloo region, Ontario, Canada
- Has thanked: 243 times
- Been thanked: 205 times
- Contact:
Re: Photo Editing Criticism and Feedback
Using the 'Place Inline" option in the Attachment box after Adding files seems to get rid of the Attachment border that surrounds some of the attached photos. Just place/click the cursor where you want the image to appear before clicking the Place Inline button. Slowly stumbling my way through the new site's subtleties so forgive me if I mention observations that may seem obvious to others.
-
Charlie Spencer
- Posts: 279
- Joined: Wed Jan 07, 2026 8:08 pm
- Location: Sunset Harbor, North Carolina
- Has thanked: 565 times
- Been thanked: 354 times
- Contact:
Re: Photo Editing Criticism and Feedback
Ha! Your first one looks within a few pixels of my first effort (2000x1500). I don't know about going out further; I don't want to lose the eye details.
Thanks!
Thanks!
Sunset Harbor NC USA
-
Lonestranger
- Posts: 494
- Joined: Wed Jan 07, 2026 9:48 am
- Location: Waterloo region, Ontario, Canada
- Has thanked: 243 times
- Been thanked: 205 times
- Contact:
Re: Photo Editing Criticism and Feedback
You know what they say, Great minds think like fools, or something like that.Charlie Spencer wrote: Sat Jan 10, 2026 6:41 pm Ha! Your first one looks within a few pixels of my first effort (2000x1500). I don't know about going out further; I don't want to lose the eye details.
Thanks!
Not wanting to ruin the flow of our relationship, but it has to be said, I really like that photo and how you cropped/processed it.
-
Charlie Spencer
- Posts: 279
- Joined: Wed Jan 07, 2026 8:08 pm
- Location: Sunset Harbor, North Carolina
- Has thanked: 565 times
- Been thanked: 354 times
- Contact:
Re: Photo Editing Criticism and Feedback
Thanks!I really like that photo and how you cropped/processed it.
Regarding the cropping, I crop everything to a 4:3 ratio, starting at 2000x1500 pixels (as in this case), then adjust in 400x300 increments if the first try was too close or far. That's why I started this discussion; I'm trying to get beyond that self-imposed restriction. The only place my cropped images get used are as eBird attachments / Macaulay. That use makes identifiability my primary consideration, but I'm trying to be a bit more creative than just centering on the bird and cropping close.
I didn't process this photo beyond cropping, and I rarely do. My big stumbling block is I don't know what I'm aiming for, what my goal is. With no artistic background, I try to reach a definitive objective 'right', which obviously doesn't exist in a subjective art form. I don't know what adjustments to make, when I've done enough or too much of any individual adjustment, or when to quit with the image as a whole. So cropping is all I do to all except in extreme cases where I'm trying to salvage a rarity or lifer.
Sunset Harbor NC USA
-
Lonestranger
- Posts: 494
- Joined: Wed Jan 07, 2026 9:48 am
- Location: Waterloo region, Ontario, Canada
- Has thanked: 243 times
- Been thanked: 205 times
- Contact:
Re: Photo Editing Criticism and Feedback
I ignore my pixel count until I am done cropping the image, I can always achieve the desired finished size without limiting myself before I start. In other words, if my desired crop/framing comes out at 3000x2000 pixels, I can then resize it to 1500x1000 afterwards IF necessary. Since more pixels typically means better quality, the larger file is preferred, especially for uploading to websites like Flickr and/or Macaulay where larger files are allowed and often preferred for the better detail they provide. I typically constrain my crops to the same aspect ratio as the camera's 3:2 ratio and very seldom try different aspect ratios. I wouldn't even call the aspect ratio a personal preference, it's more of a it is what it is attitude.Charlie Spencer wrote: Sun Jan 11, 2026 11:00 amThanks!I really like that photo and how you cropped/processed it.
Regarding the cropping, I crop everything to a 4:3 ratio, starting at 2000x1500 pixels (as in this case), then adjust in 400x300 increments if the first try was too close or far. That's why I started this discussion; I'm trying to get beyond that self-imposed restriction. The only place my cropped images get used are as eBird attachments / Macaulay. That use makes identifiability my primary consideration, but I'm trying to be a bit more creative than just centering on the bird and cropping close.
I didn't process this photo beyond cropping, and I rarely do. My big stumbling block is I don't know what I'm aiming for, what my goal is. With no artistic background, I try to reach a definitive objective 'right', which obviously doesn't exist in a subjective art form. I don't know what adjustments to make, when I've done enough or too much of any individual adjustment, or when to quit with the image as a whole. So cropping is all I do to all except in extreme cases where I'm trying to salvage a rarity or lifer.
As for post processing, I usually try the Auto Tone adjustment first and see what the program suggests and then try adjusting a few sliders only if the Auto Tone adjustment didn't quite get it right. Like you, I often don't know what adjustments to make so I often use the Auto Tone as a starting point and try making adjustments from there. I work mostly in JPG now and find myself doing less and less post processing though, hopefully because I am get better at getting it right in the camera.
-
Charlie Spencer
- Posts: 279
- Joined: Wed Jan 07, 2026 8:08 pm
- Location: Sunset Harbor, North Carolina
- Has thanked: 565 times
- Been thanked: 354 times
- Contact:
Re: Photo Editing Criticism and Feedback
I'll give that a try. My concern is that without a pre-defined box, I'll get even more wrapped around decisions. Bad enough having to decide what to capture within the box; you want me to determine the horizontal and vertical boundaries on the fly too?Lonestranger wrote: Sun Jan 11, 2026 4:35 pm I ignore my pixel count until I am done cropping the image, I can always achieve the desired finished size without limiting myself before I start.
I don't think I like the effects of paint.net's 'Auto-Level' tool. The first is how it looked that foggy morning. The second doesn't capture the experience. I also makes me want to get an 55-gallon drum of Visine. But if I liked the second one, I don't know what adjustments it made, which tools to use to reverse them, or where I would draw the line between the two.As for post processing, I usually try the Auto Tone adjustment first and see what the program suggests and then try adjusting a few sliders only if the Auto Tone adjustment didn't quite get it right.
Damn, that's awfully whiney. Let's rephrase that. If I wanted to undo some of the automatic adjustments, how would I determine what was done and which tools to reverse them?
You do not have the required permissions to view the files attached to this post.
Sunset Harbor NC USA
-
Charlie Spencer
- Posts: 279
- Joined: Wed Jan 07, 2026 8:08 pm
- Location: Sunset Harbor, North Carolina
- Has thanked: 565 times
- Been thanked: 354 times
- Contact:
Re: Photo Editing Criticism and Feedback
Well, I could read the manual...If I wanted to undo some of the automatic adjustments, how would I determine what was done and which tools to reverse them?
Sunset Harbor NC USA
-
Lonestranger
- Posts: 494
- Joined: Wed Jan 07, 2026 9:48 am
- Location: Waterloo region, Ontario, Canada
- Has thanked: 243 times
- Been thanked: 205 times
- Contact:
Re: Photo Editing Criticism and Feedback
Different software may make any explanations irrelevant. Paint.net isn't available for Mac so I can't refresh my memory on how it works, so I can't speak specifically to your editor.If I wanted to undo some of the automatic adjustments, how would I determine what was done and which tools to reverse them?
First off, when I open an image in the Develop tab of Lightroom, I have a totally different view of the adjustments than I when I am viewing the same image in the Library tab. The Library tab has many Auto adjustments, but I can't see what's going on when they're used. In the Develop tab, there is a "Tone" section, among others, to the side of the image with sliders for Exposure, Contrast, Highlights, Shadows, Whites, and Blacks. By clicking the Auto button within the Tone section, the sliders in that section get moved + or - with a visible +/- # at the end of each slider showing how much it was moved from the centre/starting point. If the image looks totally different, I'll usually start with the most adjusted slider and see if moving it towards the other end makes things better or worse. Sometimes adjusting one slider is enough to satisfy my objective, other times I play around with all the sliders, and other times I end up hitting the reset button and go with the out of camera exposure adjustments.
I usually don't like the initial Auto Tone adjustment, I find the Exposure slider is often moved too far to the right, often exposing the photo for the entire scene based on a dark background, while overexposing the bird in the process. I almost always take the sliders back towards the centre/starting point and very rarely take any slider past 3/4 of the way to the outer limits.
I'm probably not the best person to offer editing advise since I don't really know what I'm doing, and know even less about what you're doing.
-
Charlie Spencer
- Posts: 279
- Joined: Wed Jan 07, 2026 8:08 pm
- Location: Sunset Harbor, North Carolina
- Has thanked: 565 times
- Been thanked: 354 times
- Contact:
Re: Photo Editing Criticism and Feedback
This is a basic question but I've never quite understood 'depth of field'. This is a screen capture of a photo that was shot at f/10. If I had gone with a smaller aperture, would the heron on the left been more likely to be in focus?
You do not have the required permissions to view the files attached to this post.
Sunset Harbor NC USA
-
Lonestranger
- Posts: 494
- Joined: Wed Jan 07, 2026 9:48 am
- Location: Waterloo region, Ontario, Canada
- Has thanked: 243 times
- Been thanked: 205 times
- Contact:
Re: Photo Editing Criticism and Feedback
Yes, the smaller the aperture, the more there'll be in focus, maybe not enough but more. Depth of field is affected by where our focal point falls. If you focus on the herons in the back, the front heron on the left might not come in focus no matter how small your aperture. If you focus on the front heron the two in the back should fall into the depth of field much easier than vise versa.Charlie Spencer wrote: Fri Jun 12, 2026 8:39 pm This is a basic question but I've never quite understood 'depth of field'. This is a screen capture of a photo that was shot at f/10. If I had gone with a smaller aperture, would the heron on the left been more likely to be in focus?
Screenshot 2026-06-12 163507.jpg
-
Charlie Spencer
- Posts: 279
- Joined: Wed Jan 07, 2026 8:08 pm
- Location: Sunset Harbor, North Carolina
- Has thanked: 565 times
- Been thanked: 354 times
- Contact:
Re: Photo Editing Criticism and Feedback
Ah. I was trying to focus at range in the middle.Lonestranger wrote: Sat Jun 13, 2026 12:53 am If you focus on the herons in the back, the front heron on the left might not come in focus no matter how small your aperture. If you focus on the front heron the two in the back should fall into the depth of field much easier than vise versa.
Sunset Harbor NC USA
-
Lonestranger
- Posts: 494
- Joined: Wed Jan 07, 2026 9:48 am
- Location: Waterloo region, Ontario, Canada
- Has thanked: 243 times
- Been thanked: 205 times
- Contact:
Re: Photo Editing Criticism and Feedback
DOF is not split in the middle.Charlie Spencer wrote: Sat Jun 13, 2026 10:05 amAh. I was trying to focus at range in the middle.Lonestranger wrote: Sat Jun 13, 2026 12:53 am If you focus on the herons in the back, the front heron on the left might not come in focus no matter how small your aperture. If you focus on the front heron the two in the back should fall into the depth of field much easier than vise versa.
"Depth of field (DOF) is the zone of acceptable sharpness extending in front of and behind your exact focal plane. As a general rule, your DOF distribution is not split 50/50. Approximately \(1/3\) of your focus area falls in front of the focal plane, while \(2/3\) falls behind it."
Re: Photo Editing Criticism and Feedback
Why would you not just save it as a copy and keep the original unedited ?Charlie Spencer wrote: Sun Jan 11, 2026 7:40 pmWell, I could read the manual...If I wanted to undo some of the automatic adjustments, how would I determine what was done and which tools to reverse them?
-
Charlie Spencer
- Posts: 279
- Joined: Wed Jan 07, 2026 8:08 pm
- Location: Sunset Harbor, North Carolina
- Has thanked: 565 times
- Been thanked: 354 times
- Contact:
Re: Photo Editing Criticism and Feedback
I didn't make myself clear. I actually do what you suggest.john d wrote: Sun Jun 14, 2026 1:00 am Why would you not just save it as a copy and keep the original unedited ?
What I was trying to ask was if I use one of Paint.net's tools that makes several adjustments at once, is there a way I can find out the details of what it did? The idea is to see individual changes the tool's makes so I can better understand what each one does.
Lonestranger wasn't familiar enough with Paint.net to say, and I've since decided I'm content with just cropping. Thanks!
Sunset Harbor NC USA
Re: Photo Editing Criticism and Feedback
I dont user the editing tools much but it sounds like if you let it make "automatic" adjustments it's going to change a lot of different things at the same time to achieve one of its preset looks. not sure any of them let you have the original opened at the same time your editing to see what parameters are different. i think you would have to open each one and check.Charlie Spencer wrote: Sun Jun 14, 2026 9:45 amI didn't make myself clear. I actually do what you suggest.john d wrote: Sun Jun 14, 2026 1:00 am Why would you not just save it as a copy and keep the original unedited ?
What I was trying to ask was if I use one of Paint.net's tools that makes several adjustments at once, is there a way I can find out the details of what it did? The idea is to see individual changes the tool's makes so I can better understand what each one does.
Lonestranger wasn't familiar enough with Paint.net to say, and I've since decided I'm content with just cropping. Thanks!